Showing posts with label Cooking blog. Show all posts

Friday, October 22, 2010

Grandma's Meatloaf, a Comfort Food

For years this is one of the only things I knew how to really cook that was not from a box or package. I remembered watching my Grandma make it so many times as a child and it was so simple that it stuck with me.  I know its good because Ted has told me more than once that its better than his moms meatloaf.  The biggest compliment, in my book, that a man can give you about your cooking is that its better than his moms.  Especially since Ted's mom is an AWESOME cook!  Ted has told me that he actually hated meatloaf growing up and this is one of his favorite meals that I make now.  This kiddos love it too.  Everyone practically licks their plates clean.  I hope your family will enjoy it as much as ours!

What You Will Need-
1-2 lbs (depending upon your family size/appetite) of ground beef
2 slices of bread-heels work best
1 egg
3-4 potatoes peeled and cut into 4-6 slices (depending upon size of potato)
3-4 carrots peeled and cut into medallions
Salt, Pepper, Onion Powder and Garlic Powder to taste
1 jar Spaghetti Sauce-any variety you like


Step 1: Prepare the Bread Crumbs-
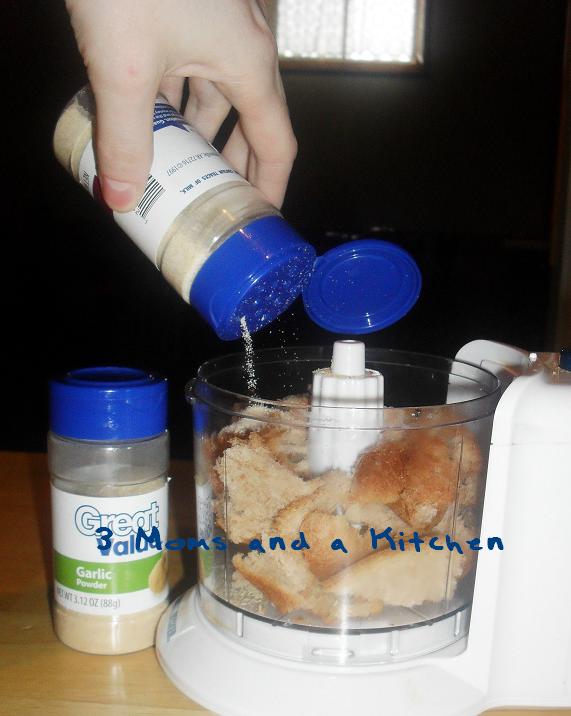
In a food processor tear up bread slices into chunks.  I like to use the heels because those usually do not get eaten for anything else.  GREAT TIP: I put them in a ziplock baggie and keep them in the freezer to pull out when I need to make bread crumbs.
Bread Crumbs
Add seasoning to taste.  Once again, like most of my recipes I am sure you have noticed, I do not measure this.  Experiment with it and see what your family likes.  You can even try other seasonings if you like.
To guesstimate the best I can I imagine I put like maybe 1/8 of a teasp salt and pepper and about 1 teasp onion and garlic powder.
Pulse food processor until everything is mixed and are coarse crumbs.

Mixing the Meatloaf
Step: 2: The Meatloaf Itself-
In a large bowl add meat, bread crumbs and eggs and mix until well combined.
I use my hands for this.  God gave you hands, don't be afraid to get them dirty, they do wash.  I wash my hands first (obviously, we would hope I do!) and take my rings off then I get in there and mash away.  Its a great stress reliever for me.
Once everything is good and mixed for meat into a "loaf" and place into a deep casserole dish that preferably has a lid to go with it.


Step 3: Add Veggies, Sauce and Cook-
Add Sauce
Recycled Foil is also a great "Green" buy


Layer potatoes and carrots around the meat.  I like to buy Organic Carrots because they are a cheap way to get some organic veggies to your family.  I would LOVE to be able to buy everything Organic but our budget does not allow for this.  However, Organic Carrots are barely more than the regular carrots.  A regular bag of carrots is a around $1 at our local stores, the Organic are like $1.28 or something like that.  Its just pennies more.  Frozen Organic Broccoli is also a great buy, especially from Costco.
Dump about 1/2 of the jar of sauce on top of the meat and veggies.
Cover everything with foil and bake in the oven at 350 for 2.5-3 hrs.
Dish up and enjoy!

Organic Carrots-A great buy for your family


Meatloaf all ready to enjoy
SIDES: Home made rolls and a garden salad are GREAT side dishes with this meal.

*Sometimes I only bake carrots with the meatloaf and make mashed potatoes to go with it instead of the baked potatoes.


This is a very special recipe to me, one that's close to my heart so please let me know if you enjoy it as much as we do.  Its my comfort food of choice.


Love,
Christy

Thursday, October 21, 2010

Gravy, its not as scary as you think


I originally posted this on my own personal blog, Adventures In Mommyhood but always meant the post to go here.  So some of you may have seen this but for most of you this is a new post.


I love gravy!  Honestly, who doesn't ?  If you say you don't you are living in denial.  Growing up my grandma made some of the best gravy I have ever had.  Its one of  MANY things I wish I had been smart enough to ask her to show me how to make before she passed away, but I didn't  When I moved out on my own I quickly realized I had ZERO cooking skills and no clue how to make gravy myself.  I didn't even know where to begin.  Gravy can be intimidating like that.  I would occasionally buy the prepackaged mixes in the store but they were never the same.  They often turned out lumpy and had some pretty questionable ingredients in them.

If the above sounds like you, I dedicate this blog to you.  It can be done, gravy does not have to be scary or intimidating.  It can be fun to make. 
WARNING: Once you learn you may find yourself making gravy with EVERYTHING.  This is a typical side effect of gravy makin skills and may fade over time as you realize you will have this power forever.  Use your powers for good only please.

After a few years of trying I just gave up on gravy, it was a dreary future of dry bland mashed potatoes for us.  Finally a good friend gave me a very simple recipe to follow.  This gave me the base line to learn from.  I am not going to type out an actual recipe here as gravy is more of a science experiment.  You have to play with it, mess with it a bit, change things around.  Depending on your tastes and preferences you may need way more fat, flour, or liquid to make the gravy the way you like it.  I will give you a basic idea to run with.

The basics you will need to get started are:

1. Some sort of fat: I personally save my bacon grease for such things as this.  I have an airtight container I keep in the fridge with bacon grease in it.  Bacon grease is great for flavor, I often add a little to oil for frying and such.  Think this is weird, people used to do this all the time, that's why home cooking tastes so good.  Fat is flavor people!  My grandma used to keep her grease out on the counter, not even in the fridge.  She had matching containers purchased from a store that were labeled "Flour" "Sugar" "Coffee" AND "Grease". 
Other alternatives you can use in place of bacon grease: butter, shortening or even vegetable oil.
You will want about 1/4 of a cup to start.  This may seem like a lot, you can use less at first if you like, but this seems to be the magic number for our families needs.

2. Flour:  Start out with 1/4 of a cup or so, this is a good starting amount.  You may have to add more later so have some extra on the counter within easy reach. 

3. Liquid: I use milk for a basic gravy, start with 1 cup.  You can also use water (I would do at least 1/2 water 1/2 milk though) and drippings from meat to make a meat based gravy.

4. Cooking Tools:  You will need a deep pan and wire whisk.  I have found the wire whisk is the best utensil in the kitchen for gravy makin.  It keeps things moving and keeps the gravy nice and smooth, lump free.  If you are one of the few who like lumps-I know there are some- use a fork.


You will want to have all of these ingredients and tools on the counter nearby, within arms reach as you NEVER want to walk away from the gravy once you start.  Gravy should always be the last thing you make, after everything else is done and ready to go.  The trick is to just keep it moving, keep that whisk dancing.

Place the pan on the stove top, medium-high heat.  Place the fat of your choice into the pan and let it melt.  You want it to get good and hot.  A nice way to check if its ready is to sprinkle a pinch of flour in, if the flour bubbles and sizzles its ready to add the rest.

When the fat is ready, add the flour.  At this point you, the pan and the whisk are one, you cannot walk away unless one of your kids is killing another, then you can let the gravy go, you can always make more.  Once the flour is in the pan WHISK WHISK WHISK.  Keep it moving.  The flour within seconds will absorb the fat and turn into a white pasty looking substance.

Once the flour has absorbed the fat (this will take about 30 seconds) add the liquid.  Start with 1 cup, you can add more later if needed.  Again WHISK WHISK WHISK.  Keep it moving.  The liquid will combine with the fat/flour mixture.  At this point you can add some seasonings if you like.  The only thing I ever add is pepper and that's only to the basic or breakfast gravy.  You can add salt, pepper, whatever you like though.

Keep on whisking, you will see it start to thicken up.  This is where the science experimentation and personal tastes come in.  As it thickens you will have to decide many things.
 Does this look like enough gravy for my family?
 If not you will want to add more flour followed by more liquid. 
Is it getting too thick?
If its too thick for your tastes add more liquid
Is it too thin?
If its too thin add more flour, this is what thickens the gravy.
As you make these changes don't forget to WHISK WHISK WHISK.  Keep it moving.
Once it is the amount and consistency that you like it is ready to eat and enjoy.


Gravy, YUM!
The biggest rule of gravy-other than WHISK WHISK WHISK  Keep it moving-is Don't set your heart on it.  At least not the first few times you make it.  Like any other experiment it will take time.  It will not be perfect the first time you make it, or maybe it will, who  knows.  Just keep trying, you will get it I promise.


We now enjoy gravy with an average of 2 meals a week.  OK, so maybe that's not real healthy but it just tastes SO DARN GOOD.  Once I got the basic gravy down, using fat flour and milk, I began to experiment with making meat gravies.  These are very simple too, you just replace the milk with the drippings of the meat..  They make great accompaniments to the meal.  If you made a pot roast, use the drippings for a gravy and pour it over the meat.  Make some potatoes or rolls to go with the gravy.  The possibilities are endless.  With meat gravies I often use butter in the place of bacon grease, not always though.  Your family, and their tummies, will thank you for  your new skills.

 Now go make some gravy!

Apples and Pork Chops, the perfect Fall Dinner

Normally I would never post a blog without taste testing the food first but I ma 100% convinced this is going to be yummy.  Maybe its just my apple obsession talking here.  The recipe was given to me and I was told it is good and several wanted me to post it soon so I am taking a leap here.

The original recipe called for only 4 pork chops, we are having company tonight so I used 6.  It also only called for 1 apple and some nutmeg, I expanded upon this based on the reviews Heather gave me when she gave me the recipe.  I am using Honey Crisp Apples with this recipe, of course, you can use whatever kind of apples you like. 


What You Will Need:
4-6 Pork Chops, whatever cut you would like
4-5 good size Apples
2 Tblsp Brown Sugar
1 Tblsp Granulated (white) Sugar
1 Teasp Cinnamon
1/2 Teasp Nutmeg
3-4 Tblsp Butter
Salt and Pepper to taste

Pork Chops-fresh from the pig
Step 1: Prep The Pork-
In a medium frying pan coat bottom with oil.  Allow oil to become nice and hot over medium/high heat.  Lightly Salt and Pepper the pork on each side.  Once oil is hot brown chops on each side.  You are not trying to cook the meat here, just brown and bit and seal in the juices.  You want to cook about 1 minute per side.

Step 2: The Apples-
Peel and core apples.  When I am planning on cooking apples I like to peel them with a potato peeler.  It takes pretty much just the peel and saves all the yummy goodness inside for you to use, no apple is wasted. 
Once apples are peeled and cored chop them into slices as if you were making an apple pie.  Each apple will make about 10-12 slices.
apple slices nicely coated
In a large bowl combine Brown and Granulated Sugar, Cinnamon and Nutmeg.  Add in apple slices and toss with your hand until they are evenly coated.

Step 3: Add Everything To The Crockpot-
Layer 3 pork chops on the bottom of the crockpot, top with half of the apples.  Dot with butter.  I did not measure this part but I imagine I used 1-2 Tblsp of butter per layer.
Layer remaining chops, the rest of the apples and dot with butter again.
In order to get all of the seasoning out I added about 2 Tblsp of warm water to the bowl and splashed it around a bit so that it got almost all the seasoning left in the bowl and then poured this into the crockpot too.  Thats totally optional though, I am a cheapskate like that and want to make sure everything gets used.

Step 4: Cook and Enjoy-
in the crockpot and all ready too cook
Cook on low setting for 6-8 hrs and enjoy.  I will come add more once we have actually eaten this and will post a picture of the finished product.


Just realized I never came back to post the final results.  Sorry, there is no picture, we were all starving and just starting eating it.
I checked everything at the 6 hr mark and decided it needed more sugar.  I am going to leave the amounts above as a starting point and you can decide for yourself if you want more.  I added another Tblsp of granulated sugar and I am not sure how much more brown sugar.  When I make this again I will most likely use 1/4 of a cup of brown sugar and 2 Tblsp of granulated sugar.

I do plan to make this again, it was very yummy although I wouldn't recommend using more than 4 pork chops.  I used 6 because we had company coming and it just seemed to be too much for the recipe.  I think it would've tasted much better with just 4.  I also plan to layer all of the apples in the middle next time as the apples on top did not cook as well as the ones in the middle did.

So there you have it, the final verdict: Good but needed much more sugar and less meat so as not to overwhelm the overall taste of the dish. 

This is a keeper though and I will be making it again.

Love,
Christy

Tuesday, October 19, 2010

Chicken Stir Fry... The easy way!

This is the easy version..
get a packet of stir fry seasoning found in the spice section
of your local supermarket. for every lb of chicken you have.


1-2 chicken boneless skinless chicken breasts cut into cubes.
and take your pick or amount of any of these usual stir fry veggies.
broccoli
baby corn
water chestnuts
bamboo shoots
red (yellow or green) bell pepper
scallions (to taste)
snap peas
carrot
cabbage.
soy sauce (I like using liquid aminos better)

The beauty of this dish is you can add or take away any of those or your own ingredients
and still have an impressive dish, if you are a picky eater this is for you! add what you like!

You sautee the chicken in a large skillet or wok with a bit of olive oil some salt and pepper and the chopped scallions.


once it's browned you add the tough veggies first, for example the broccoli, the peppers, the chestnuts and go ahead and add the packet flavoring according to its instructions.

let it simmer for a bit with a lid so the veggies can cook (about 5 mins)
next add the medium veggies, like bamboo shoots, snap peas, carrot etc. simmer a bit more (about 2 mins)

lastly add the cabbage as much as you'd like I like a lot in mine because by the time it's cooked you can hardly see it!
simmer another 2 minutes with the lid..

give it another good toss and serve over white rice!!


and impressive yet easy dish!
Enjoy! <3<3
Tanya E.
Related Posts Plugin for WordPress, Blogger...