We are coming back...
- Jess and Tanya
(and possibly you??)

Thursday, February 2, 2012
Monday, February 7, 2011
Guest Blog! Pumpkin Soup!
We'd like to thank Dominique for sending us this great recipe for soup! Its sloooowly beginning to warm up here in The Big Easy, but still cold enough for some soup!
Check out Dominique's blog at " I Must be Mad"
- Jess K.

 1small pumpkin or 1/2 a medium pumpkin - DE-seeded and cubed (1" cubes)

Check out Dominique's blog at " I Must be Mad"
- Jess K.
I killed Kenny...then i ate him!
Don't worry Kenny was a pumpkin! Here is the recipe for Kenny soup...

Ingredients:
 1small pumpkin or 1/2 a medium pumpkin - DE-seeded and cubed (1" cubes)
2small onions - peeled and cut into 6wedges each
3fat garlic cloves - separated but not peeled or crushed
1pint/550ml of vegetable or chicken stock
Salt'n'Pepper (not the girl band)
Olive oil
Olive oil
And a mix of the following according to your own tastes;
1/2tsp of ginger powder
1/4tsp chili powder
(i used this one with a little shake of white pepper also)
or 1/2tsp of curry powder
or 1/2tsp of cinnamon
Instructions:
- Pre-heat oven to 200-220 degrees (Gas 4-5)
 De-seed and cube pumpkin, put the seeds to one side for later. Bin the skin. Peel and cutonions into six wedges each. Put veg in a roasting tin/tray (we used a large Le Cruset dish) add the garlic whole with its skin on. Mix so all is coated in the oil.
- Roast for about 40mins until pumpkin is golden brown and soft to touch. Squeeze the garlic out of its skin and into the veg. Pour all veg into a large mixing bowl or saucepan.
- Meanwhile (whilst near the end of roasting the veg) bring a large pan of your stock to the boil.
 Pour the stock into the bowl of veg and puree to your desired consistency. (if to thick you can add plain water to thin it out, i added about another 250ml)
 - Now add your chosen spices/flavour and season to taste. (You could also add a little soy or Worcester sauce if you like)
- Heat through and serve with a sprinkle of your roasted seeds and sweet potato wedges (recipes to follow) Or just crusty bread if you like?
- Don't forget the glass of vino!!!!


~ENJOY~
This recipe makes 2adult portions and 1baby portion. For baby's portion you need to spoon out enough for 1 serving for them before you add any seasoning (NO salt for baby)

Tuesday, February 1, 2011
And the winner is......
Jessica !!!!
Her entry "Puttin' on the Ritz Chicken" was one that all three of us liked!
Email us at cookinmamas@yahoo.com so I can mail you out your prize!
 A big thank you to Shannon's Accessories for donating the prize!
Thank you all for participating and stay tuned for more giveaways!
- Jess K.
Her entry "Puttin' on the Ritz Chicken" was one that all three of us liked!
Email us at cookinmamas@yahoo.com so I can mail you out your prize!

Thank you all for participating and stay tuned for more giveaways!
- Jess K.
Friday, January 28, 2011
Fan Friday-Taco Braid
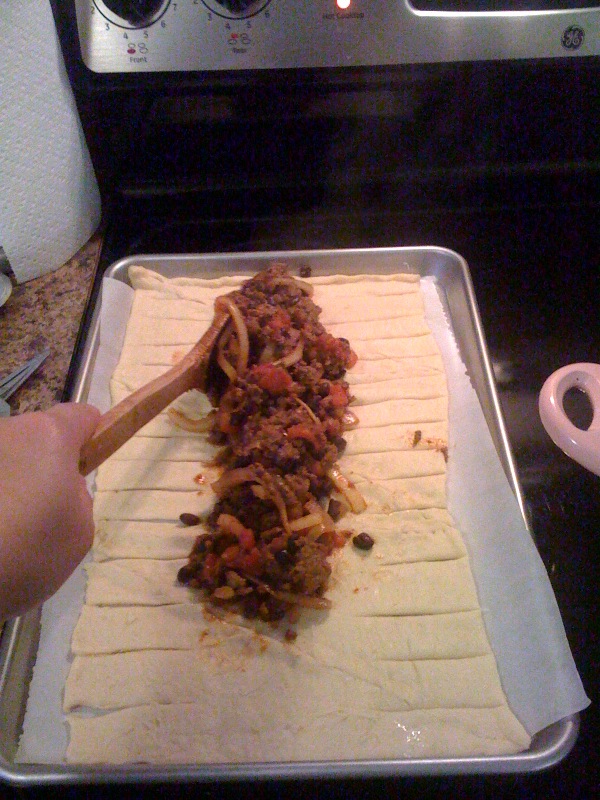
1/ In a skillet, brown 1lb of ground meat. Season with your favorite taco seasoning.
When meat is just cooked through add half of a small onion and let cook a few minutes. Adding the onion now keeps it slightly crunchy.
Rinse and drain 1- 15oz can of black beans. Add to meat.
Drain 1 can of rotel tomatoes. Add to meat.
Heat til mixture is hot through out.
2. Line a baking sheet with parchment paper (makes clean up easy). Roll out 1 package of crescent roll onto baking sheet. Mend the perforations.

3. Cut crescent sheet on both sides 1inch apart. A pizza cutter works well

4. Put cooked meat mixture in center of cut crescent sheet

5. Put 2 cups of grated cheddar cheese on top of meat mixture

6. Fold crescent strips over meat mixture and press the strips together to seal the braid.

7. Bake in 350° oven for 20-25 minutes or until golden brown

8. Let sit for 5-10minutes to allow the Taco Braid to set.

Serve and enjoy.
Thank you so much Christy K. for sharing this yummy and easy recipe with us!
I must say that I made this last night for dinner and it was so good! I made it using the dough recipe that I use for everything and I added a "sauce" at the bottom made by mixing 1/2 cup salsa (pureed in the food processor) and 1/2 can of vegetarian refried beans. I layered this on the bottom then added the meat on top and braided the bread closed. I didn't have any black beans so I skipped that part and I honestly forgot to add the cheese inside haha. It was super yummy and a big hit in our home. Kinda like a taco pizza calzone. We topped it with our usual taco topping favorites including salsa, tomatoes, lettuce, sour cream, shredded cheese and avocados.
-Christy
When meat is just cooked through add half of a small onion and let cook a few minutes. Adding the onion now keeps it slightly crunchy.
Rinse and drain 1- 15oz can of black beans. Add to meat.
Drain 1 can of rotel tomatoes. Add to meat.
Heat til mixture is hot through out.
2. Line a baking sheet with parchment paper (makes clean up easy). Roll out 1 package of crescent roll onto baking sheet. Mend the perforations.

3. Cut crescent sheet on both sides 1inch apart. A pizza cutter works well

4. Put cooked meat mixture in center of cut crescent sheet
5. Put 2 cups of grated cheddar cheese on top of meat mixture

6. Fold crescent strips over meat mixture and press the strips together to seal the braid.

7. Bake in 350° oven for 20-25 minutes or until golden brown

8. Let sit for 5-10minutes to allow the Taco Braid to set.

Serve and enjoy.
Thank you so much Christy K. for sharing this yummy and easy recipe with us!
I must say that I made this last night for dinner and it was so good! I made it using the dough recipe that I use for everything and I added a "sauce" at the bottom made by mixing 1/2 cup salsa (pureed in the food processor) and 1/2 can of vegetarian refried beans. I layered this on the bottom then added the meat on top and braided the bread closed. I didn't have any black beans so I skipped that part and I honestly forgot to add the cheese inside haha. It was super yummy and a big hit in our home. Kinda like a taco pizza calzone. We topped it with our usual taco topping favorites including salsa, tomatoes, lettuce, sour cream, shredded cheese and avocados.
-Christy
Wednesday, January 19, 2011
Snow Ice Cream

I must give credit to Dionna at Code Name: Mama for giving me this idea. I have seen snow ice cream referenced more than once this past week and was curious how to make it. If you refer to the above link Dionna has several variations of the recipe. I kinda combined a few of them together and came up with the following 2 variations. So if its snowing where you are set out a large mixing bowl to collect some as it falls. If there is snow on the ground, make sure its clean and fill up a bowl. You will need about 1 large mixing bowl (approximately 1 gallon) for each recipe.

What You Will Need:
Snow
1 14 oz can unsweetened condensed milk
1 packet
of hot chocolate mix (or a couple Tblsp cocoa powder or chocolate syrup should work too)
1/4 cup sugar
1 teasp vanilla
To Make:
Add all ingredients into bowl with snow and mix until well combined. I let my oldest help me with this, he loved it.

The second kind I tried was a peach variation. This reminded me of a peach yogurt smoothie, so good!
What You Will Need:
Snow
1 can peaches
1 14 oz can unsweetened condensed milk
1/4 cup sugar
1 teasp vanilla
To Make:
Empty out peaches, juice and all, into a smaller mixing bowl. Cut peach slices into bite sized pieces.
Add peaches (juice and all) into snow. Add rest of ingredients until well combined. I needed slightly more than 1 large mixing bowl of snow for this variations, probably because I added the peach juice and the milk.
Eat and enjoy.
Name That Recipe Contest and Giveaway!
Today we have a special post for y'all! I am going to post a recipe below that has no name. Its something my mom had me make one evening when I was low on ingredients and time. Now if you are counting calories, this might not be the chicken dish for you, but it sure is yummy and simple and quick!
But what makes this post special is that it isn't just a recipe this time, its a contest and a giveaway! This is where our lovely readers come in. We want YOU to name this recipe! Something fun, or quirky, or whatever! Be creative! And then Tanya, Christy, and I will each pick our personal favorite and will submit those to random.org to pick the final winner.
POST A COMMENT ON THIS POST BELOW WITH THE NAME YOU COME UP WITH! CONTEST WILL CLOSE IN ONE WEEK ON WEDNESDAY JANUARY 26, 2011.
Our giveaway is sponsored by a fabulous small business called Shannon's Accessories. Check out her adorable selection of things of the little (or big!) girls in your life! You can also find her on Facebook by clicking HERE. Thank you Shannon! Our winner will receive this super cute headband!


SO.. without further ado.. Here is the recipe we need you to name!
Ingredients
-1 boneless skinless chicken breast per person
-mayonnaise
-shredded cheddar cheese
- crackers (I used Ritz)
- salt and pepper
Directions
- Pound out your chicken breast so its an even thickness

- Season with salt and pepper

- Add some mayo to a bowl

- Add a little shredded cheddar to the mayo and stir it together

- Crush some crackers into another bowl and season the cracker crumbs with salt and pepper.

- Spread some of the mayo mixture onto one side of the breast.

- Sprinkle cracker crumbs on generously and press down with hand to make sure they are good and stuck.

-Flip chicken over (I put it right on my nonstick cookie sheet) and repeat.

-Bake at 350 for about 25 minutes, until chicken is fully cooked.
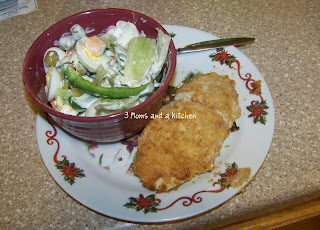
Enjoy and put on your thinkin' caps and NAME THAT RECIPE :o)
- Jess K.
Monday, January 17, 2011
Mexican Ratatouille?

There is a Spanish name for 2 dishes made in a similar fashion.. If you omit the Pasilla peppers then it is called "calabazitas con queso" If you Omit the "calabazitas" (meaning the squash) it would be called "Rajas con queso", I love both and one day I asked myself why can't they both be together? I mean they're made the same way pretty much.. and so I did.
The dish which is nameless in English and maybe in Spanish too, is sort of a Mexican ratatouille, it consists of zucchini or any squash you might want to use, (please feel free to experiment with this recipe!) tomatoes, garlic, onions (If you like them), Corn, the peppers (If you'd like.. I advice to use them as it gives it a nice smokey favor and really blackening them is not as hard or intimidating as it seems) and I top it all with cheese!
*If you want a figure friendly version top it off with Mozzarella cheese (It looks pretty with the melted round slices on top) and keep it vegetarian.
*If you need meat in it I would suggest cubed or shredded chicken (skip the cheese) Or Italian sausage and keep the cheese!.
As with all the recipes here get creative you do not have to recreate this 100% Use what you like and feel comfortable with! Have some fun!
INGREDIENTS
3 Pasilla peppers
4 Italian zucchini squash
4 Roma tomatoes
1 can of corn
1 small can of tomato sauce
minced, or powdered garlic.
Cheese (any melting cheese you'd like)
salt and pepper to taste.
Start by blackening the peppers (If you have an electric stove I am not sure if it will work unless you grill them) After they are black meaning the skin is burned quickly place them inside a towel so they "sweat" and set them aside.


In a large pan, add a bit of Extra Virgin Olive Oil, some minced Garlic and Onions (if you are using them)
Cut the zucchini in half lenght wise and then chop into pieces, add to the oil with the garlic, if using garlic powder then you would add the powder to the zucchini.
I found a great way to have minced garlic handy I am in love with this as it is so finely minced it can blend in butter or any other sauces..


While that is cooking cut up the Roma tomatoes in big chunks and add them to the zucchini.
Take the peppers and with some running water remove the blackened skin, if there is some still left don't worry. Cut the tops off and throw them away along with the seeds and cut what is left into strips and add them to the pot.

Drain your can off corn and add it to the pot along with the tomato sauce and 1/4 cup of water. Let it simmer for 3 minutes stir it, and add your cheese cover and simmer for 2 more minutes and you are done!
Easy right?

Enjoy!
Subscribe to:
Posts (Atom)